Zoom Cloud Recording Retention
What is happening?
Starting Thursday, December 1, 2022, all Zoom Cloud Recordings will follow a new storage and retention schedule. Recordings can only be retained for 365 days from the date of the recording. After 365 days, recordings will be deleted from Zoom Cloud Storage.
On December 1, any existing Zoom Cloud recordings older than 365 days will be moved to your Zoom account’s recording trash folder. Recordings are held in the trash folder for 30 days and then permanently deleted. During those 30 days, you can recover any needed recordings before they are permanently deleted.
Instructions to Recover Recordings
Options to retain recordings for long-term use appear below. Please refer to the Data Privacy Office’s page on Zoom Recordings for details and considerations regarding FERPA and Public Records.
Why is this happening?
Over the last two years Zoom has played a significant role for students, faculty, and staff across our campus. Because of this UNF’s Zoom cloud recording storage has reached its storage limit.
Who is impacted?
All Faculty and Staff who have made Cloud recordings in Zoom. Student Zoom accounts are unaffected as students are not licensed for cloud recording. Zoom recordings made to a computer’s local storage (hard drive) are not impacted by this retention schedule.
How does this affect my Zoom Cloud recordings?
Existing Zoom meetings and webinars recorded before December 1, 2021 will expire immediately and be moved to Zoom’s recording trash for 30 days until permanent deletion.
New recordings of Zoom meetings and webinars after December 1, 2021 will expire and be moved to Zoom’s recording trash after 365 total days of being stored.
What can I do to save my recordings?
There are several ways to retain Zoom recordings. A common method is to download the recordings you’d like to keep to OneDrive or to an external flash drive or other storage device connected to their computer.
Contact the ITS Help Desk with any questions or help you may need with saving your recordings.
Download Zoom Recordings
- Sign in to Zoom (https://unf.zoom.us/)
- Select Recordings on the left side navigation.
- Under the cloud recordings tab at you will have a list of the recordings you have made to the Zoom cloud. Select the topic of the meeting to see the individual recording files.
- To download all files, hover over a recording, select the three dots and then download.
- The download option will list a number of file types that will be download. Review the type of formats you will see.
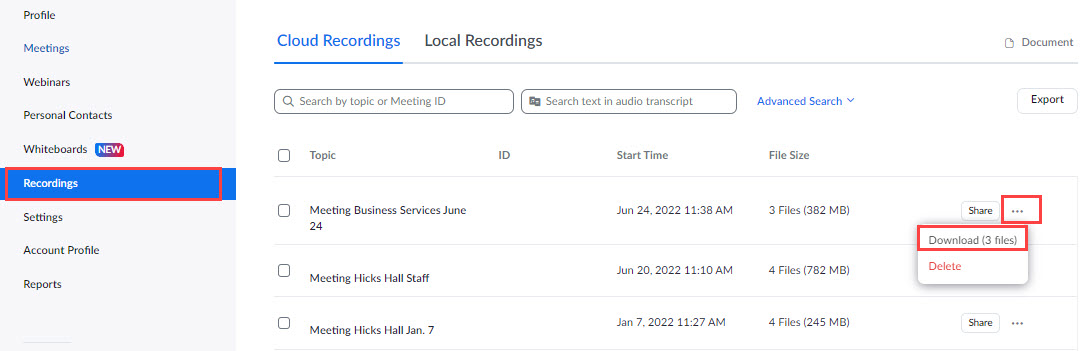
Note: recordings may be large files that consume storage space on your computer. It is recommended that the downloaded recordings be uploaded to OneDrive or an external flash drive is used to store the files.
Upload Zoom Recording to OneDrive for Business
After downloading recordings to a computer, they can be uploaded from that computer to OneDrive.
The steps below detail instructions for uploading files via the OneDrive website, for more information on uploading using different methods visit Upload photos and files to OneDrive.
Using the OneDrive website
Depending on the web browser you use, you can upload files up to 100GB in size. (This limit is per file, not total.)
- On the OneDrive website, sign in with your UNFID and password and then browse to the location where you want to add the files.
- Select Upload
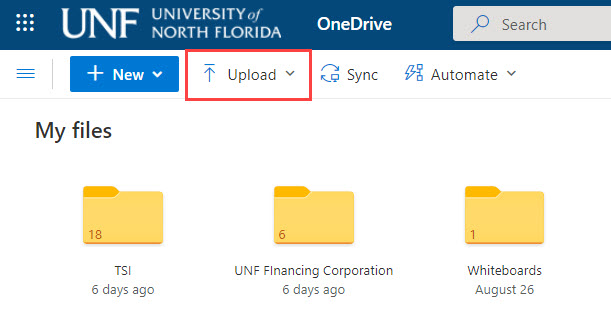
- Select the files you want to upload from your computer, and then select Open.
- After uploading the files to OneDrive, be sure to delete them from your computer's downloads so they don't take space from your computer's storage.
Tips:
- You can also drag files from File Explorer or Mac Finder straight to your files on the OneDrive website.
- In the Google Chrome or Microsoft Edge browser, you can also upload folders from the Folder option on the Upload menu, or drag folders to the website.
- Learn ways to organize and find photos in OneDrive.
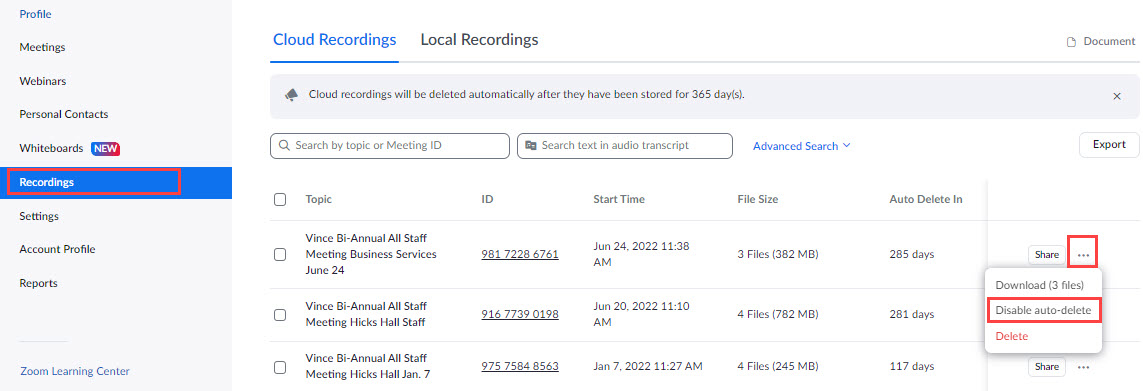
Special Case Option: Disable Auto-Delete for Individual Recordings
For recordings that you would like to retain in the Zoom Cloud platform, you can disable the auto-delete for an individual file in Zoom.
- Sign in to Zoom (https://unf.zoom.us/)
- Select Recordings on the left side navigation.
- Under the cloud recordings tab at you will have a list of the recordings you have made to the Zoom cloud. Select the topic of the meeting to see the disable auto-delete option.
- Select disable auto-delete from the list. Your files will not be deleted automatically after 365 days.