
Accessibility Resources for Faculty
Back to CIRT ADA Title II page
Canvas Accessibility | Document Accessibility | Image Accessibility | Video Accessibility
Explore curated guides and checklists designed to support faculty in creating accessible digital content.

Instructor Role in Ensuring Accessibility
How To Guides
Canvas Accessibility
Creating accessible content in Canvas not only supports students with disabilities but also enhances the learning experience for everyone by accommodating diverse learning preferences. While Canvas’s default settings meet basic accessibility standards, instructors can take additional steps to make their courses more inclusive and effective. Using tools like the Rich Content Editor (RCE) and built-in accessibility checkers can help ensure materials are clear, organized, and easy to navigate. This section will guide you through four key strategies for improving accessibility in your Canvas courses: using the Canvas Accessibility Checker, using Ally, structuring pages with proper headings, and creating descriptive link text. To learn more about these and other Canvas accessibility best practices, refer to CIRT’s Canvas / Accessibility support article or read our blog post Declutter Files for a More Accessible Experience. You can also use CIRT's Canvas Course Accessibility Checklist to review the accessibility of your course.

Using the Canvas Accessibility Checker
The Rich Content Editor (RCE) in Canvas includes a built-in Accessibility Checker to identify and correct common accessibility issues. Use the Accessibility Checker to automatically run the page of content through an automated checklist to detect any issues that could pose a barrier for students. For additional help, read the Canvas article How do I use the accessibility checker in the Rich Content Editor as an Instructor?
Using Ally in Canvas
Ally is an accessibility checker integrated into Canvas that automatically reviews uploaded course files for accessibility. This tool provides instructors with feedback on the accessibility of uploaded files and guidance to make those documents more accessible. Ally also automatically provides alternative formats for files uploaded, such as HTML, electronic Braille, and audio, which are available to both students and instructors.
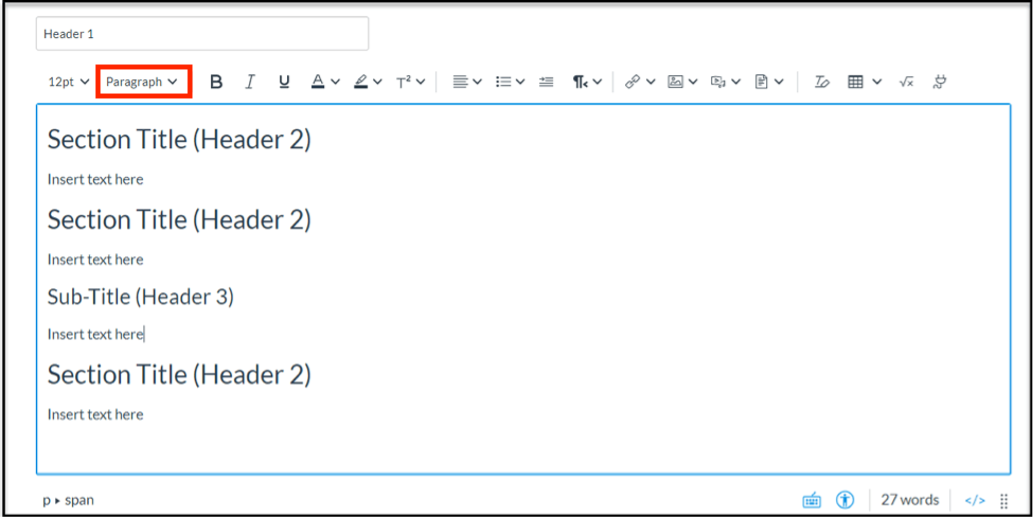
Structuring Pages with Headings
In Canvas, use the Rich Content Editor (RCE) to organize content with proper headings. While bold, italics, color, or larger font may look like headings to sighted users, they are not accessible to screen readers. Applying true headings in the RCE ensures all students can navigate and understand your content.
To apply headings, open the “Paragraph” drop-down menu. Note that Heading 1 is already reserved for the page title and will not appear as an option. Start with Heading 2 for main sections, and use it consistently for subjects at the same level. If you need a subheading under a Heading 2, use Heading 3. You can return to Heading 2 when starting a new main section. Be sure to keep headings in the correct order so screen readers can navigate them properly—do not skip levels.
Creating Descriptive Links
When adding links in Canvas, use specific and meaningful text rather than vague phrases like “click here” or “see this video.” Descriptive links clearly communicate the purpose of the link, making it easier for all students—including those using screen readers—to navigate and interact with your content. Links have a distinct style; avoid underlining other text and use italics for emphasis instead.
Correct Uses of Links:
- Download the Fall 2025 Course Syllabus
- Watch the Introduction to WordPress Training Video
- Read the UNF Accessibility Guidelines
- Submit your assignment via the Canvas Submission Portal
- Explore Faculty Resources for Online Teaching
Incorrect Uses of Links:
- Incorrect use 1: Click here
- Incorrect use 2: More info
- Incorrect use 3: See this
- Incorrect use 4: Link
- Incorrect use 5: Here
Document Accessibility
Creating accessible documents is a simple step that pays off over time by ensuring course materials are easy for all students to navigate and understand. While PDFs are a popular and convenient format for sharing information, they can pose challenges when not properly structured, creating barriers for students who rely on assistive technology. The best approach is to build accessibility into your source documents from the start so that the final version is usable by everyone. This section will introduce key best practices to help you make your documents more accessible and effective for all learners.
Word Documents
Follow these accessibility guidelines when creating Word documents:
- Use sans-serif fonts like Verdana and Arial in 12-point font or larger.
- Use meaningful descriptive text for links instead of including raw links.
- Use the preset “styles” to apply headers (H1, H2, H3, etc.) for organization, rather than bolding or increasing font size.
- Ensure documents have a logical reading order for screen readers by selecting Headings on the Navigation panel
Tip: Word files are easier to make accessible than PDFs. Only convert documents to PDF after they are made accessible, and only when necessary.
Additional Help:
PDFs
Follow these guidelines to make PDFs more accessible:
- Avoid scanned PDFs; use original digital formats whenever possible.
- PDFs must be tagged for proper reading order and include headings, lists, and tables.
- Use real text, not embedded images of text.
Tip: Ensure form fields in PDFs are fillable and navigable without requiring a mouse.
Additional Help:
PowerPoint
- Use sans-serif fonts like Verdana and Arial in 24-point font or larger.
- Use simple, preset slide layout formats and avoid busy, themed backgrounds.
- Logically structure the content of slides, and set the reading order.
- Include alt text or image descriptions for all images.
Tip: To make narrated PowerPoint presentations accessible, convert them into videos (.mp4), upload them to Canvas Studio, and edit the automatically-generated captions.
Additional Help:
Accessible Tables
When using tables in documents, keep the structure simple so screen readers can interpret the data correctly.
- Format tables with defined header rows and columns and clear labels, not just for visual appearance.
- Avoid merging cells, and use “n/a” instead of leaving cells blank.
- Add a caption that describes the table.
- For Excel, label worksheets with clear names rather than leaving them as “Sheet 1” or “Sheet 2.”
Tip: Consider whether your information might work better as a list.
Lists
Properly formatted lists help those who rely on keyboards to navigate web content.
- Use parallel structure (similar wording or grammar) in list items to improve readability.
- Use built-in list features: Numbered when order matters, bulleted when it doesn’t.
- Nested lists that use a mix of bullets and numbers are okay to use.
- Avoid using numbers/symbols and spaces in place of built-in list features.
Tip: Break up long or complex information into smaller lists for easier navigation.
Color
When using color in your course materials, follow these tips to ensure the content is accessible:
- Avoid relying on color alone to convey meaning.
- Color combinations provide sufficient contrast between foreground and background.
- Check your color choices with an accessibility tool such as WebAIM’s Contrast Checker.
- Use bold style for important words instead of using color or highlighting.
Tip: Add patterns or symbols alongside color to make the content even more accessible.
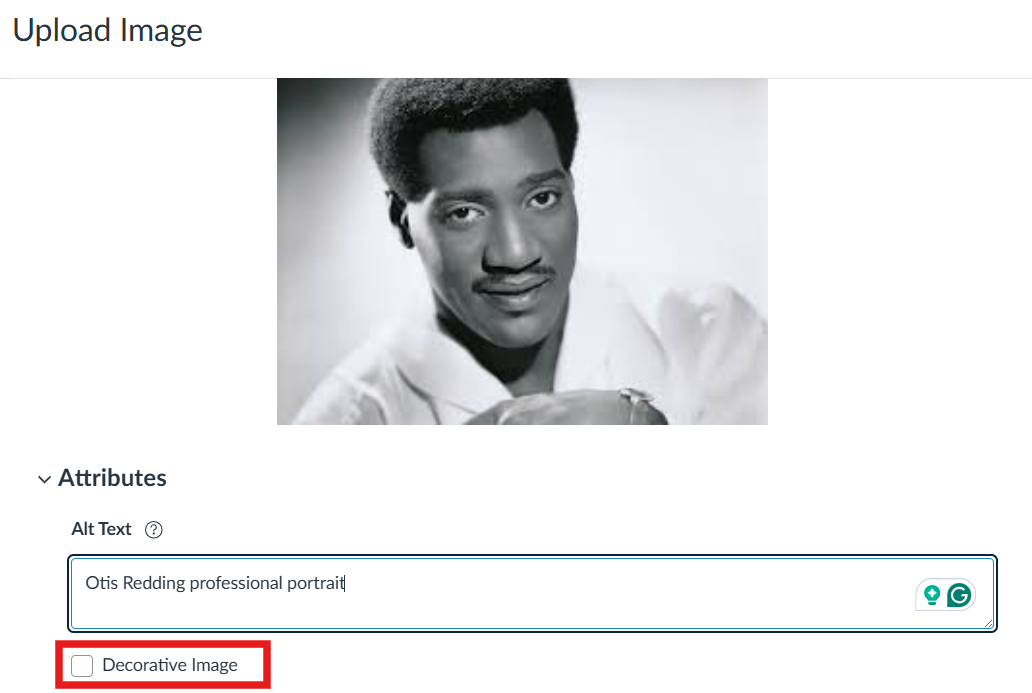
Images
Every image, chart, or graphic must include meaningful alt text that describes its purpose.
- Avoid using text embedded in images.
- Keep alternative text accurate and concise (120 characters or less).
- Write meaningful and descriptive alternative text.
- Divide complex images into multiple images when possible.
- Provide alternative text for all visual elements, including charts, graphs, mathematical/scientific notations, images, and figures
- Mark decorative images as decorative.
- Avoid using flickering text, animations, or GIFs, as these can be distracting or inaccessible to some viewers
- Provide extended descriptions in the surrounding text for all complex images, including charts, graphs, mathematical/scientific notations, and figures.
Additional Help:
Videos
![]()
Creating accessible video and audio content is an essential step in ensuring all students can fully engage with your course materials. While multimedia enhances the learning experience, it can also create barriers when captions or transcripts are missing or inaccurate. Students who rely on assistive technology—or who are studying in environments where audio cannot be played—may be excluded without these supports. By incorporating accurate captions, transcripts, and audio descriptions from the start, you can make your multimedia content inclusive, effective, and accessible to all learners. Avoid using flickering text, animations, or GIFs, as these can be distracting or inaccessible to some viewers.This section will introduce key best practices for making video and audio materials more accessible and impactful for everyone.
Note: Artificial Intelligence (AI) captions are only about 85% accurate, depending on various factors such as sound quality, speaker accent, etc. Please don’t hesitate to contact CIRT at cirtlab@unf.edu to discuss options for additional accommodations on a case-by-case basis.
Caption & Transcripts
- Provide closed captions for all videos that are synchronized with the audio and accurate in spelling, grammar, and mechanics.
- Use captions to include both dialogue and relevant sounds, supporting a wide range of learners (e.g., non-native speakers, students with learning differences, or those in noisy environments).
- Ensure that all audio-only content (e.g., podcasts, recorded lectures) includes a full written transcript.
- Add descriptive audio or textual descriptions when visual elements are essential to understanding the content and not explained in the narration.
- When creating video files in Canvas Studio, edit the automatic captions for accuracy and readability.
- For external videos (e.g., YouTube, Vimeo), select only those with high-quality captions that are accurate and error-free.